Signup for our newsletter to get notified about sales and new products.
£60.21
6 in stock
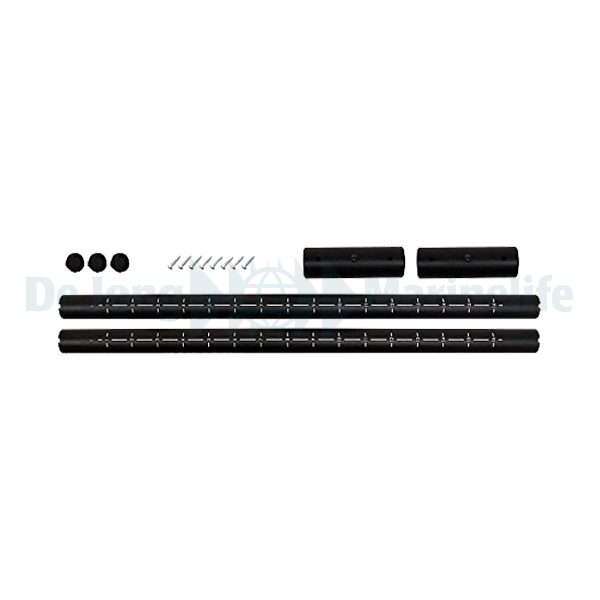
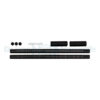
The Kessil Extension Mount is designed to be used with the Mounting Arm and provides customers with additional mounting option. It is designed specifically for acrylic or euro-braced tanks, by affixing the mounting arms to the tank stand. The Extension Mount comes with two extension tubes, allowing a total length of 57.5(1.46 m). It is compatible with A160, A360, and AP700.Weight: 1.32 lb / 600 gDimensions: ø 1x H 37.8(ø 25 mm x H 96 cm)Scope of delivery:2x Extension Tube2x Coupling (pre-installed with M4 round head hex screw, L=0.2/ 5 mm)8x M4 phillips wood screw4x M5 thumb screw
h3 leftNo. of Extension Mount Sets Required for AP700
rightimg src=https://kessil.com/images/product/accessories/KSAEM01/Accessories_ExtensionMount_size_3756.jpg"kessil Extension Mountwidth=603height=458
right
getting_mounting_step leftimg src=https://kessil.com/images/product/accessories/KSAEM01/manual_01.jpg" width=300height=300
h21/h2
Insert Arm and Extension Tube(I) into Coupling(II) until they meet the slot opening. Use two M5 Thumb screws(IV) to secure both tubes.*Mounting Arm needs to be purchased separately.
getting_mounting_step leftimg src=https://kessil.com/images/product/accessories/KSAEM01/manual_02.jpg" width=300height=300
h22/h2
Insert both Extension Tubes(I) into Coupling(II) until they meet the slot opening. Use two M5 screws(IV) to secure both tubes.*(Optional).Longer extension requires 2 sets of Extension Mounts for AP700 setup.
getting_mounting_step leftimg src=https://kessil.com/images/product/accessories/KSAEM01/manual_03.jpg" width=300height=300
h23/h2
Use four M4 Phillips Wood screws(III) to secure the Tube Adapter on wood stand. Put Extension Tube(I) into the Tube Adapter. Secure them with two M5 Thumb screws.*Tube adapter and M5 Thumb screws are in the Mounting Arm box.
getting_mounting_step leftimg src=https://kessil.com/images/product/accessories/KSAEM01/manual_04.jpg" width=300
h24/h2
f_WAP700 displayFollow steps A4 to A10 (on Mounting Arm box) to complete installation.*Flatten the AP700 cable before fitting into the arm. f_WA1XX/A3XX displayFollow steps B1 to B4 (on Mounting Arm box) to complete installation.
6 in stock